One-Click Snippet Sharing
Snippet Sharing allows you to send someone a code snippet and its context with a link that you generate in the Pieces Desktop App or one of our extensions.
Effortlessly share code snippets, screenshots, and other resources with a personalized access link (e.g., YOUR_USERNAME.pieces.cloud), in just a few steps.
Getting Started with Shareable Links
Before getting started with snippet sharing, make sure that you are signed in so that we can create your private cloud.

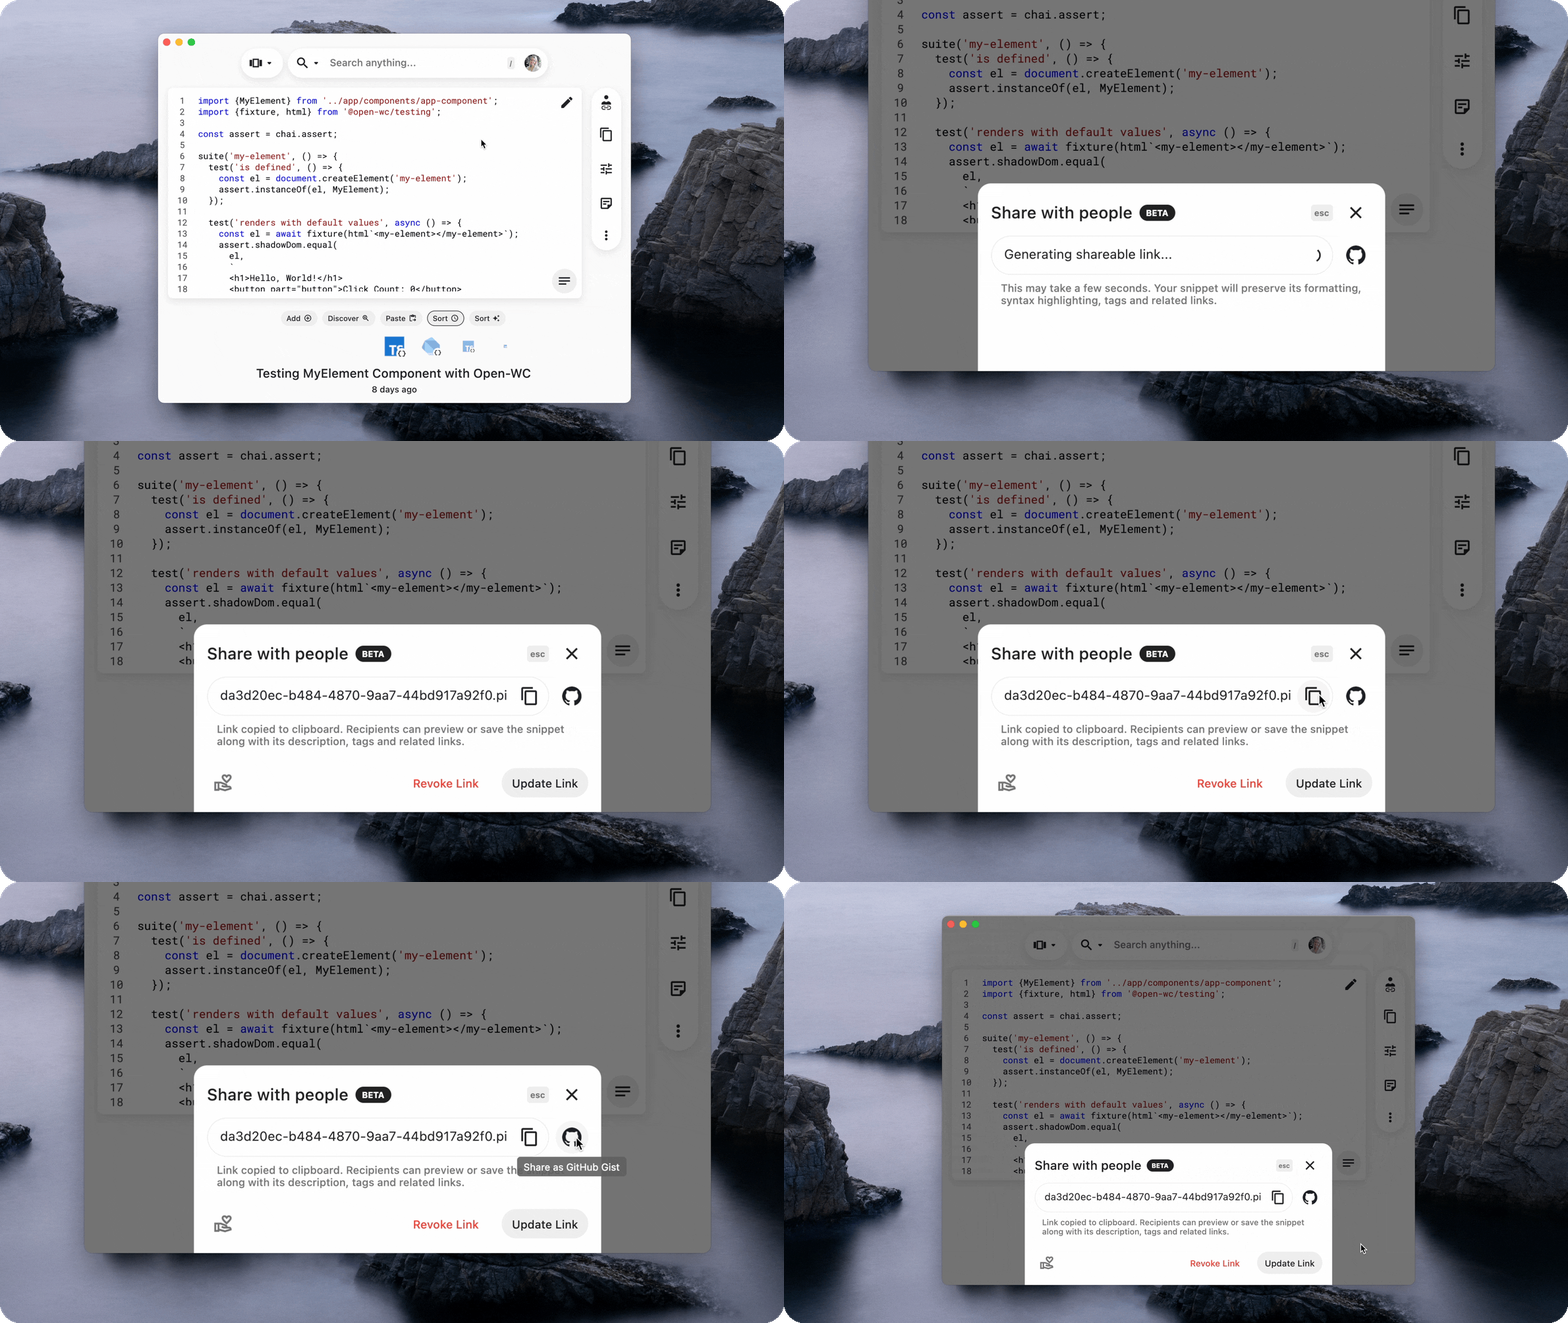
- After signing in and ensuring that you are connected to the cloud, select any snippet in the desktop app.
- Click the Shareable Link icon on the Action menu to the right side of your window.
- This will open the Shareable Link drawer, which has a few different possibilities:
- The link should already be present if you are connected to the cloud
- A spinner will be there with a message reading "Generating your shareable link"
- This process normally only takes about 10 seconds
- "Connect to cloud" will be present if your cloud connection did not complete automatically, but you can click the cloud icon to connect
- If you are not signed in, you can select the text box that says "Connect your Account"
Sharing as a GitHub Gist
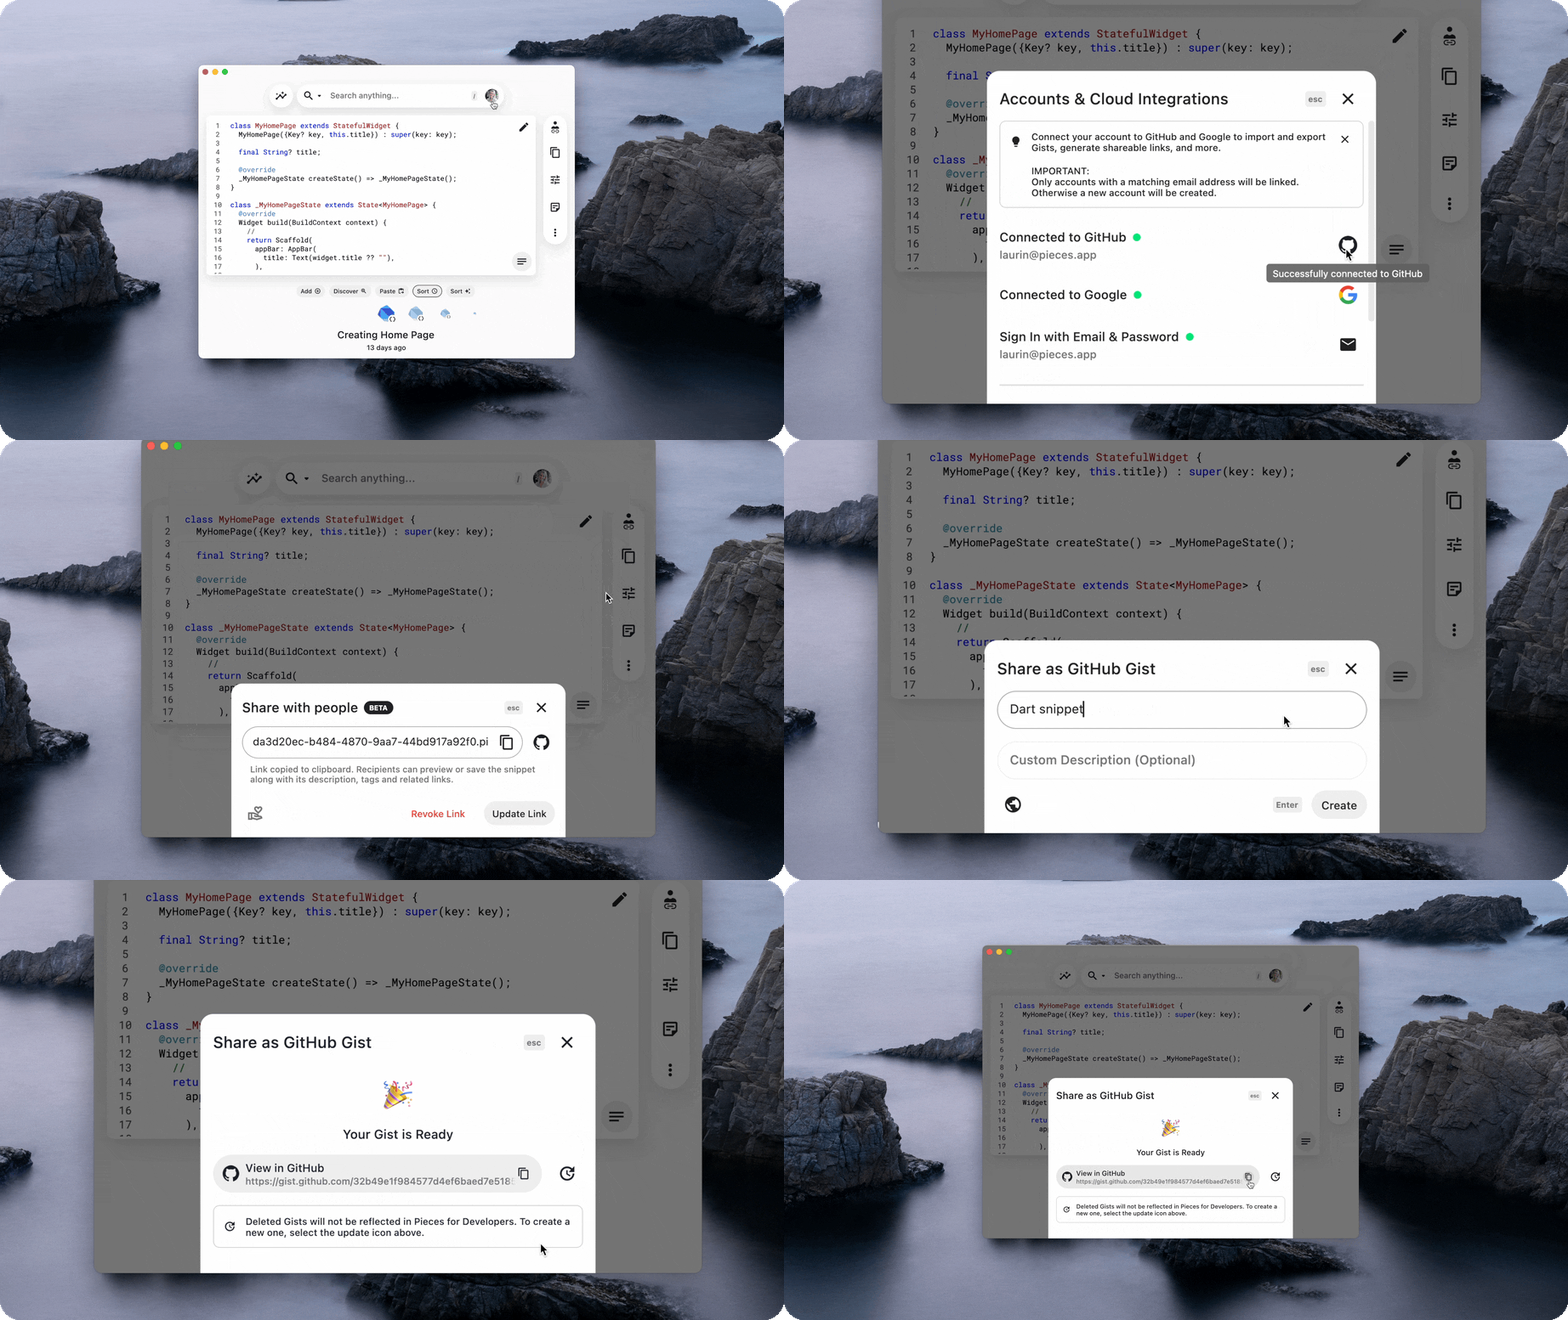
Sharing as a Gist is a great alternative to Shareable Links if you want to post the code to your public gists, so it is accessible to more people without having to send individual links.

To do this, navigate to the Shareable Link drawer mentioned above, then:
- Click "Generate GitHub Gist" below your shareable link.
- If you have not authenticated with GitHub you will have to in order to generate a Gist.
- (Optional) Create a title and a description.
- You can create a title and a description from here, or you can skip this step and a generated title will be created for you.
- Click "Create" and you'll get the link to the Gist.
Bundled Metadata Preview
Every Gist has a Markdown Preview built using our Context Awareness Engine and Origin Details that includes relevant information to the snippet's context.
Claiming a Custom Domain

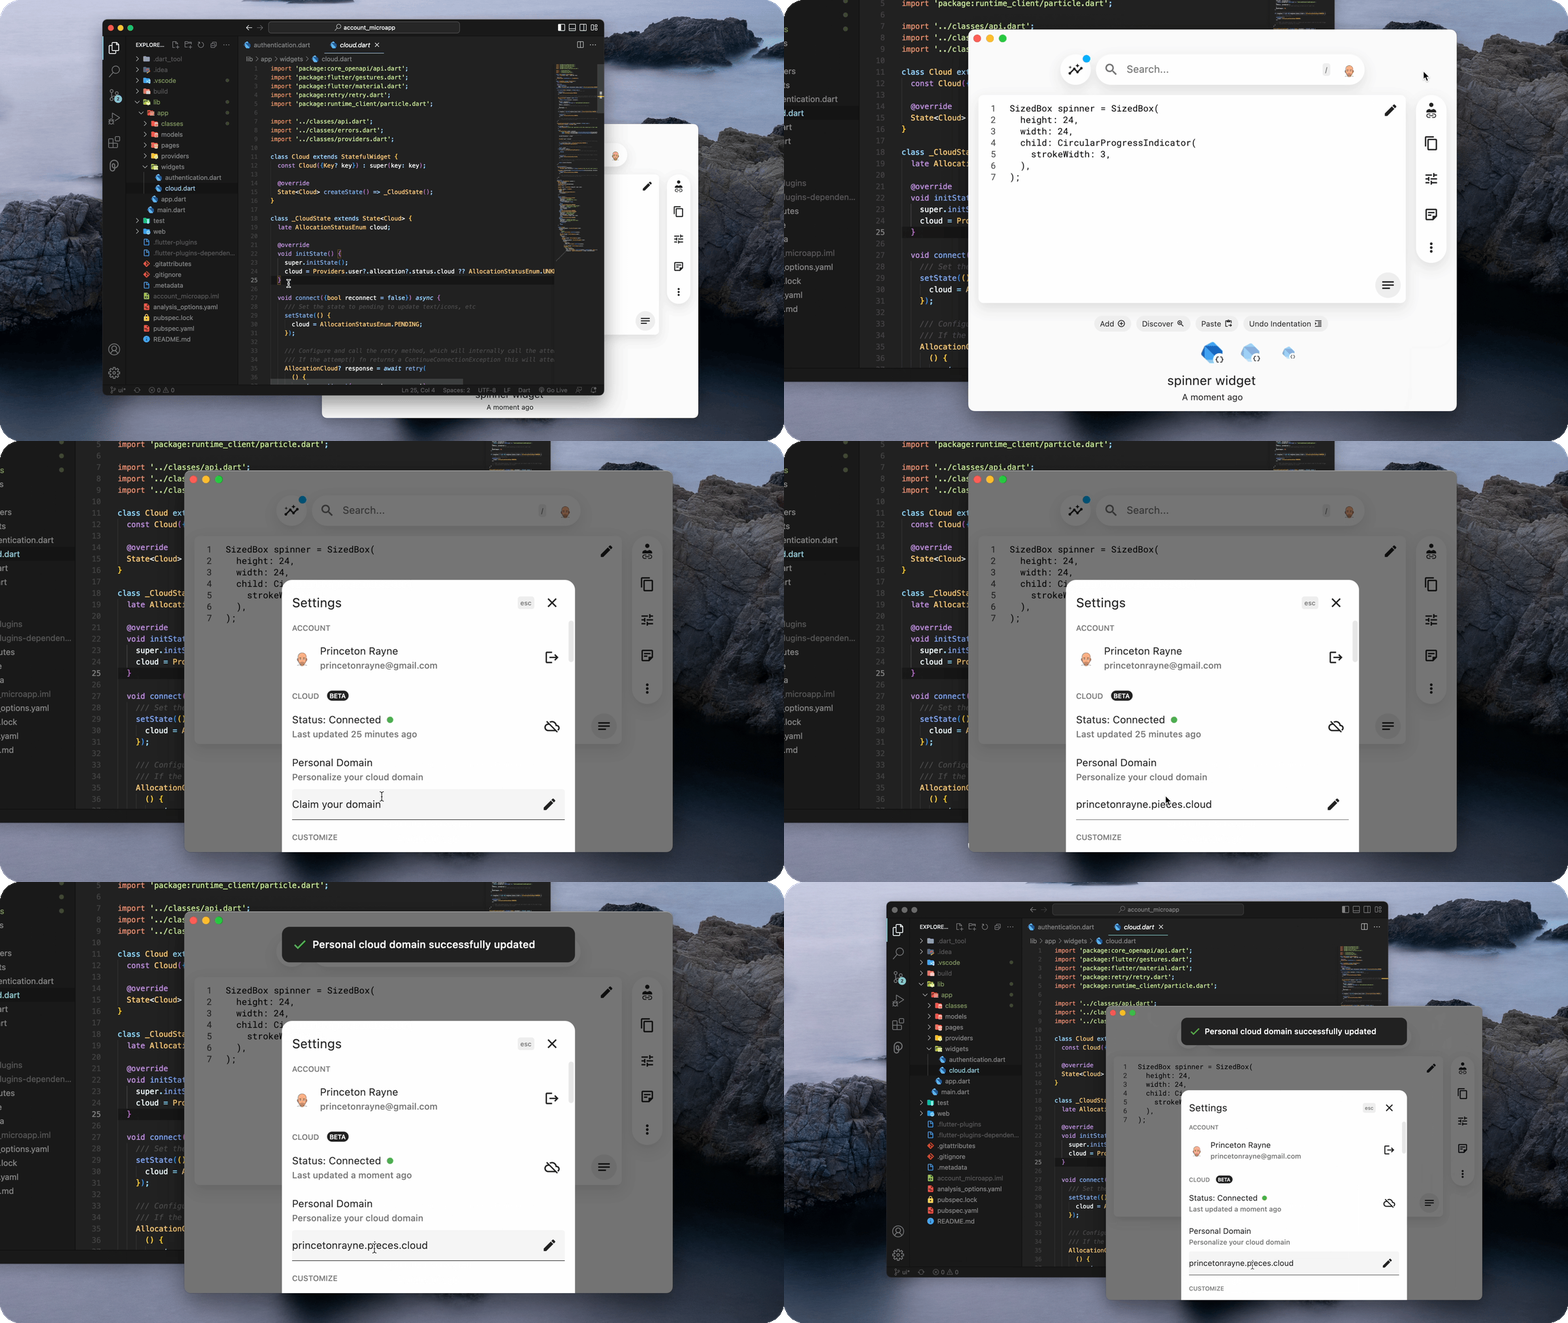
Claiming your custom domain can be done from the Pieces Desktop App only - so be sure to get the app if you want to claim your unique domain.
To claim your custom personal domain:
-
Open your settings by pressing
,or clicking your user icon. -
Find "Claim your Domain" in the text box followed by .pieces.cloud.
-
Input the new, unique name that you want (this will be on all of your shareable links).
- No special characters or uppercase letters
- Example:
powersnippets.pieces.cloud
Important Note: Updating your personal cloud domain can take up to 15 minutes. Don't worry, we'll notify you when this is complete.
Sending Someone a Saved Material
In order to send someone a link to your shared resource, simply take the URL from inside the Shareable Link drawer and paste it into places like:
- Google Chat
- Microsoft Teams (We have an app for that!)
- Text Message via iOS Messenger or Android Messenger
- Slack
- X (formerly Twitter)
Each link that you generate and send looks slightly different, but all will be marked by your Custom Shareable link, just like in this example from our friends at dart-tutorial:
https://snippets.pieces.cloud/ + ?p=111d45b730
Saving a Shared Material you Received
When you receive a shareable link from someone, you can start by clicking the link that you received or pasting it into your browser. This will open our Sharing Web App that allows you to view the shared material before saving it.
Once on this page, you can save the snippet to Pieces by pressing the Save to Pieces button at the top of the page.
You can now access and reuse the locally saved resource in the Desktop App or in your IDE with the Pieces for Developers VS Code Extension or Pieces for Developers JetBrains Plugin.
Try it out with this Python snippet.
Updating Access or Data Attached to Shared Snippets
If you edit the resource or add additional contextual metadata, Pieces will either recommend that you update the link or automatically update it for you. This happens in the background without generating a new access link, meaning previous recipients can stay up-to-date and you don't have to re-share.
Lastly, we know that accidental shares happen and permission levels can change. You can always revoke a shareable link at any time.
Using Pieces Shareable Links with Brave Browser
When using Brave, your browser will detect shareable links as needing to be blocked, because of the Pieces popup that requests to communicate with your instance of Pieces OS. (This is similar to opening a Zoom link if you use the Zoom desktop app.) In order to view the snippet and avoid any unwanted functionality, you have to turn off your Brave browser ad blocker or add Pieces to your whitelist of sites.
Turning off your Ad Blocker in Brave
Note that this will affect your ad blocker for all sites. To modify a specific site's ad block status, Disable ad blockers and tracking while on the shareable link's webpage.
To provide sharing data and related people, we do light, noninvasive analytic tracking on these pages. To view the snippet:
- In the Brave Browser, click the Brave icon at the top right of the screen.
- Once this is selected, it will show a drop-down menu. Click the cog icon in the bottom left corner.
- Once the Brave rewards page opens, click Settings at the top left of the page.
- Click Shields.
- Once on this menu, change the Trackers & ads blocking drop-down to Disabled.